fbpx
Category

Custom FMQ Sampler Quilt Along

Category

Here is my last post for the About A Quilt Sampler! This quilt uses the ‘Quilt-As-You-Go’ technique.Thank you for keeping up with me, it was a lovely journey of documenting this QAL.

If you happen to land here first, I have archived all of the posts HERE so you can go through all the tutorials for each block and quilting tutorials included in this quilt-along.

We are now at a stage where we can piece all the blocks together and finally bind the quilt!

Woohoo!! This the last block for our quilt along “About A quilt Sampler” .

If you happen to land here first, I have archived all of the posts HERE so you can go through all the tutorials for each block and quilting tutorials included in this quilt along.

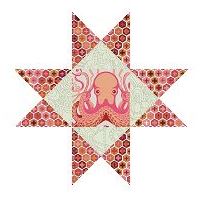
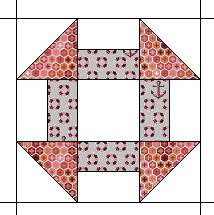
For this final block, we are making a star block.

It seems simple, but a bit tricky when piecing those sharp points. Last time we made this similar block here, I find that it is easy to make error and get a smaller block at the end. However, this time round, I figured out a better way to limit those errors. Follow the instruction below and hopefully, you will be able to get good 12.5″ unfinished block!

Block #9 cutting instruction:

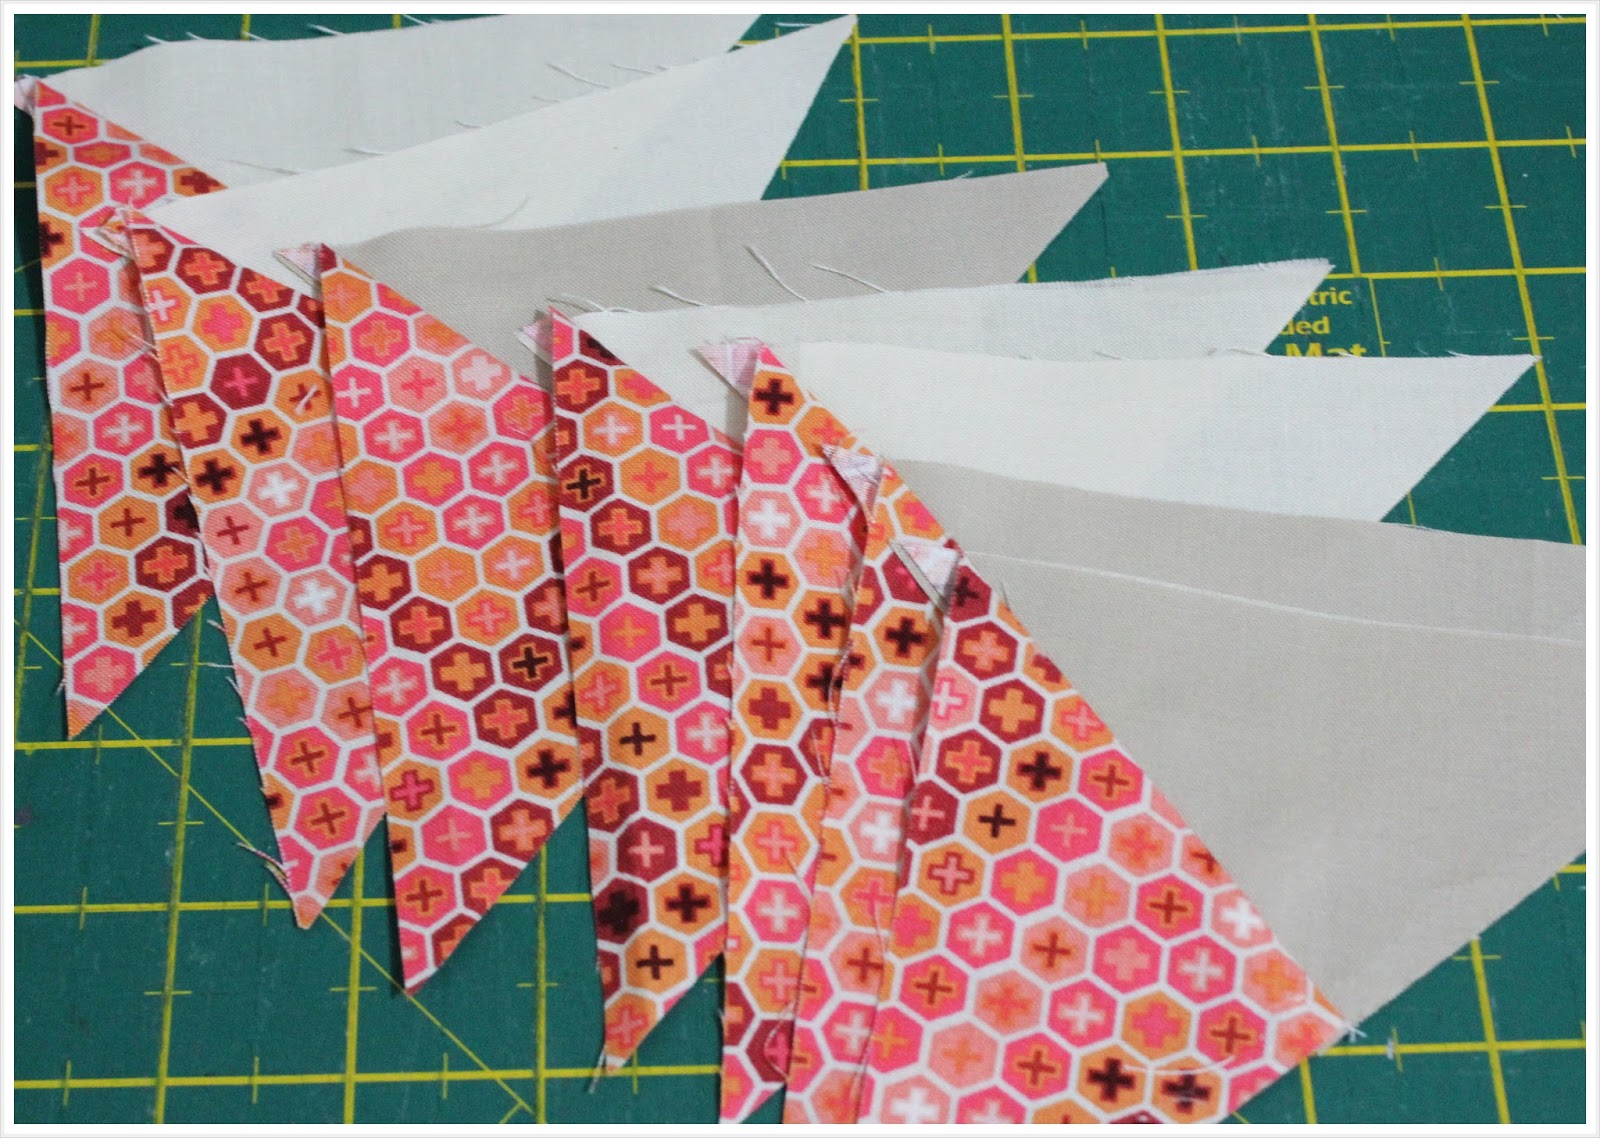
From background fabrics,
cut 4 pieces of 4 7/8″ x 4.3/4″ squares and cut 4 pieces of 4 1/2″ squares (not shown in photo)

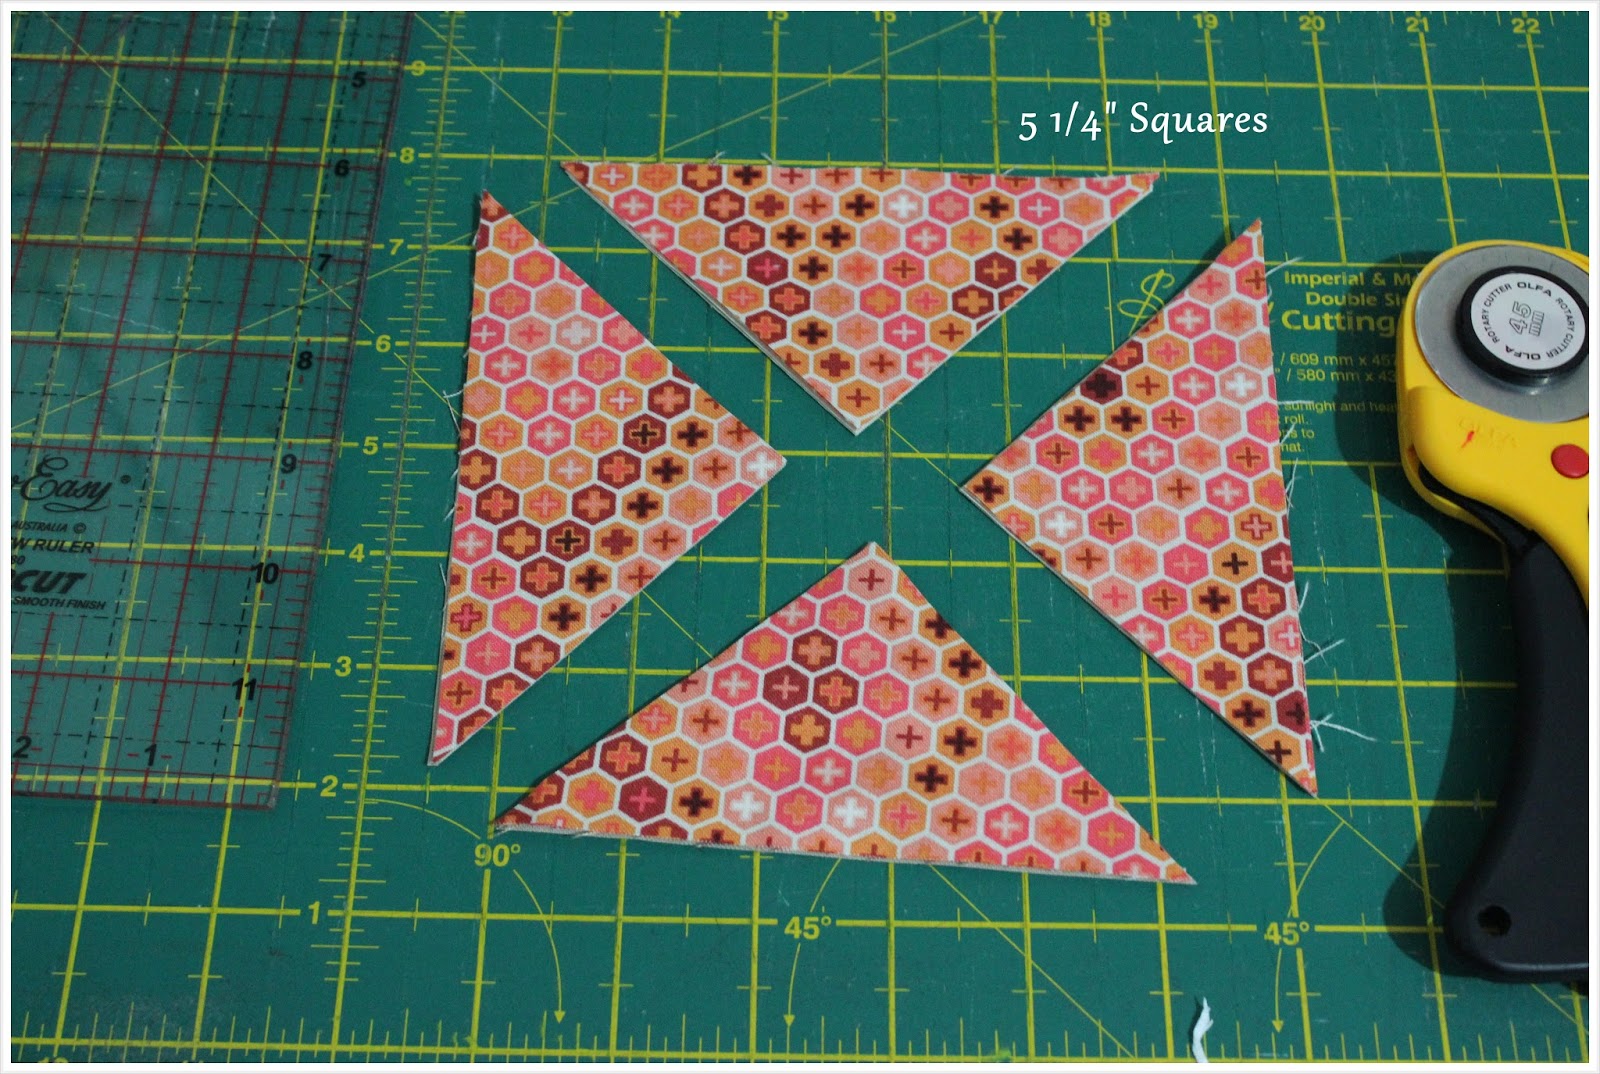
From printed fabric for the star points,
cut 4 pieces of 5 1/4″ x 2 5/8″ rectangles

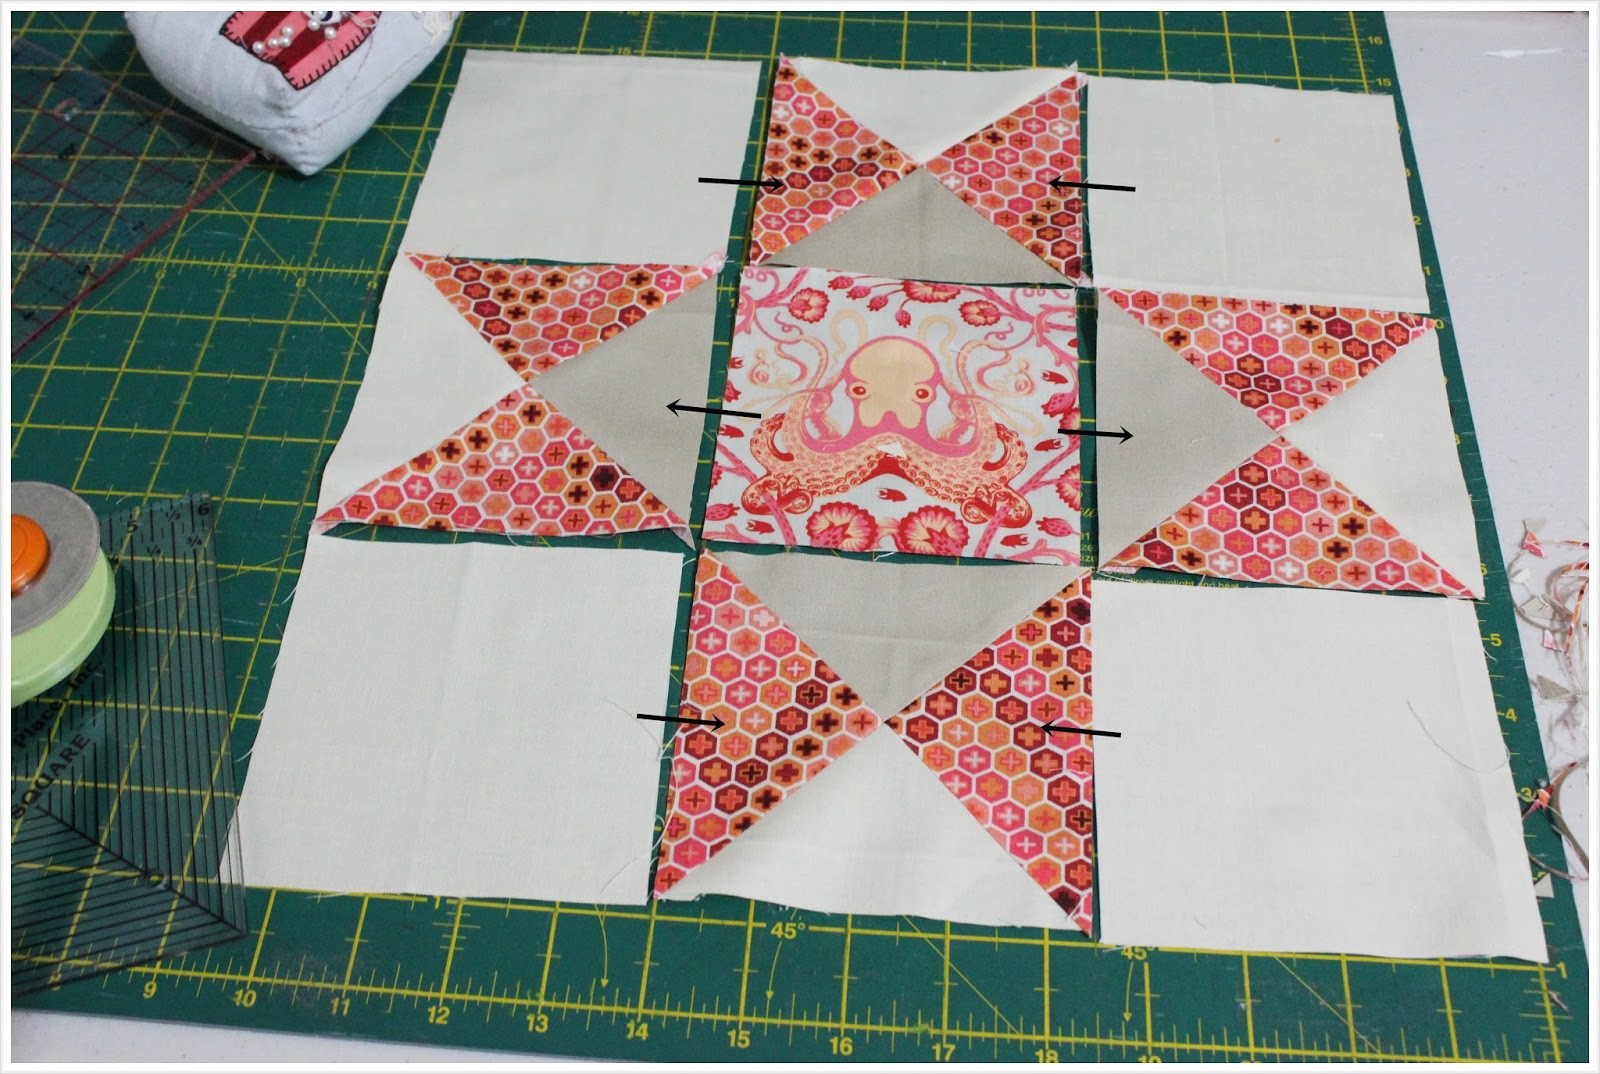
From the printed fabric for the center;
cut 1 piece of 4 1/2″ square

For the star points, cut 2 pieces of the rectangular piece in half through the diagonal. Do the same with another 2 pieces, except this time, diagonally in opposite direction.

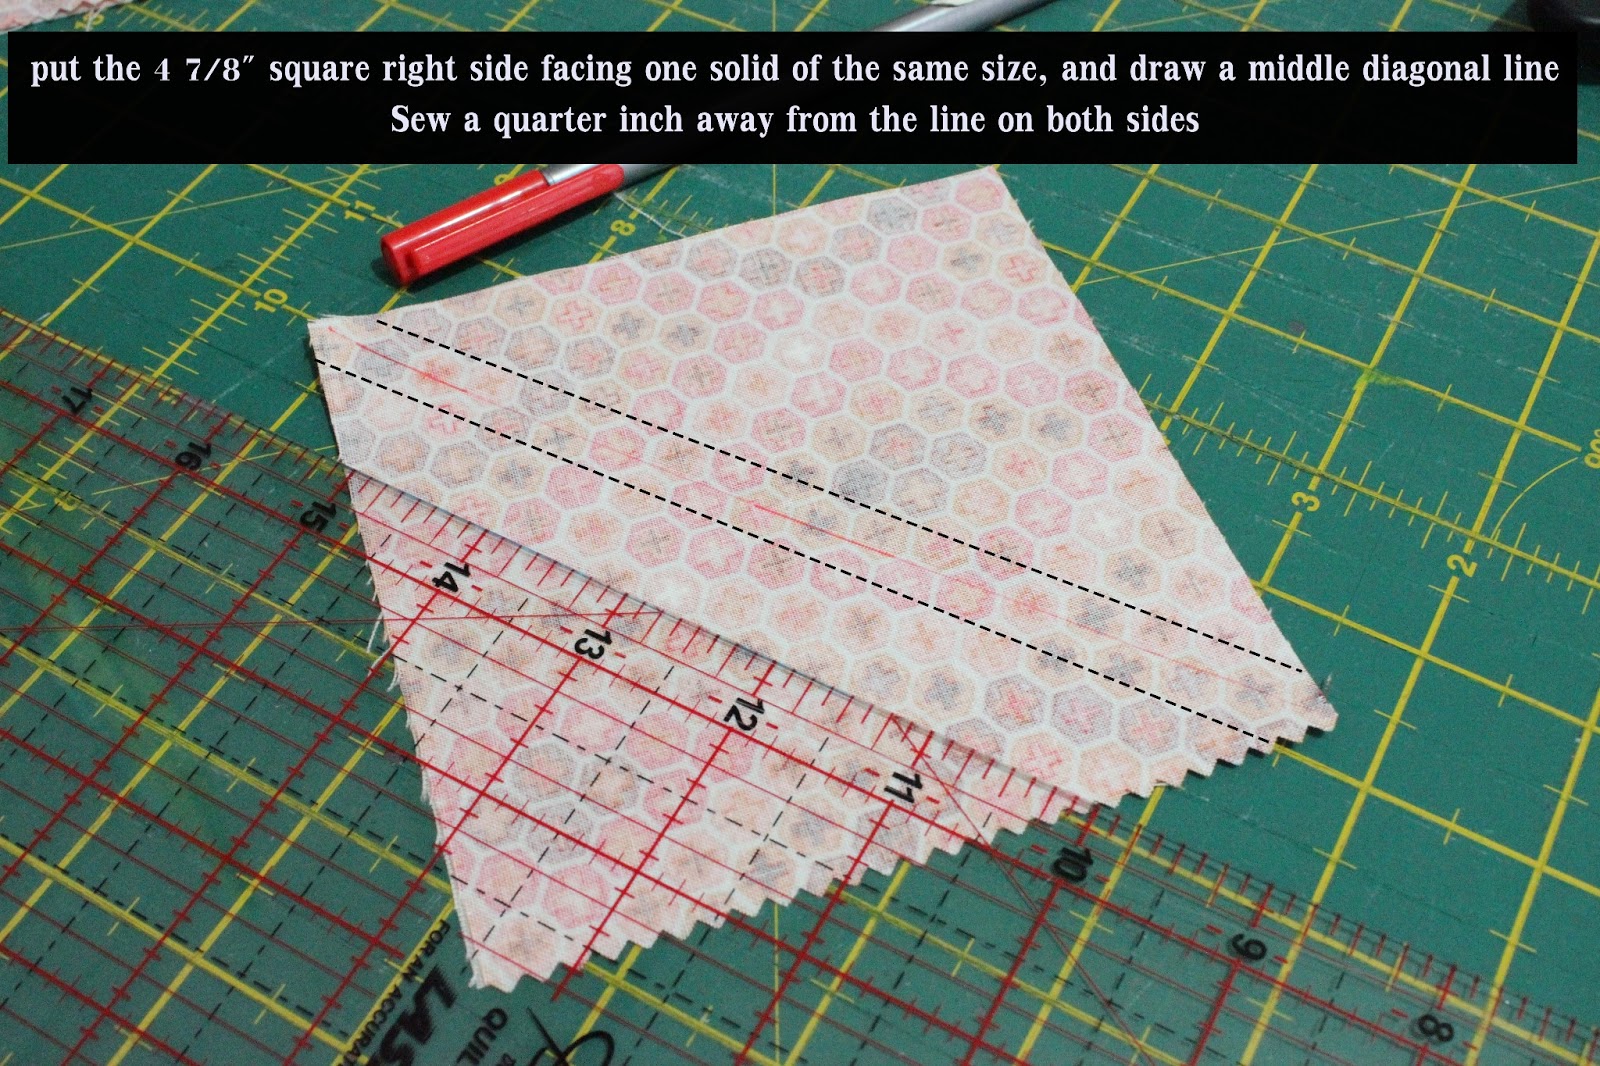
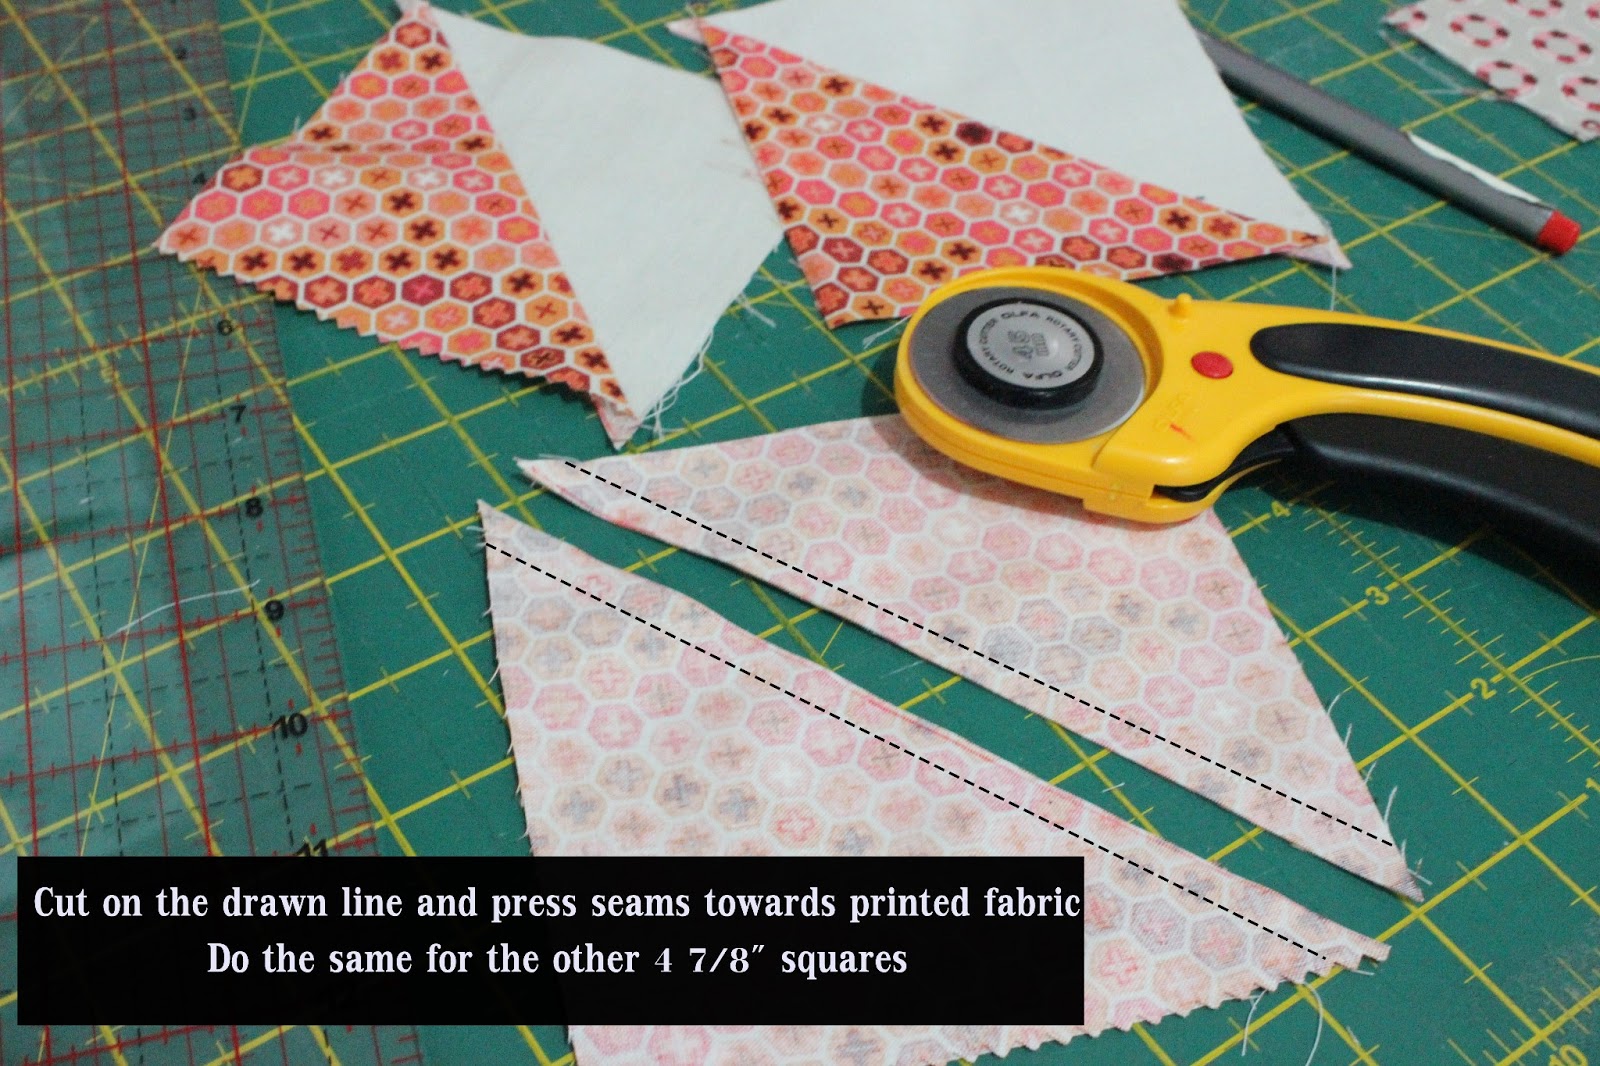
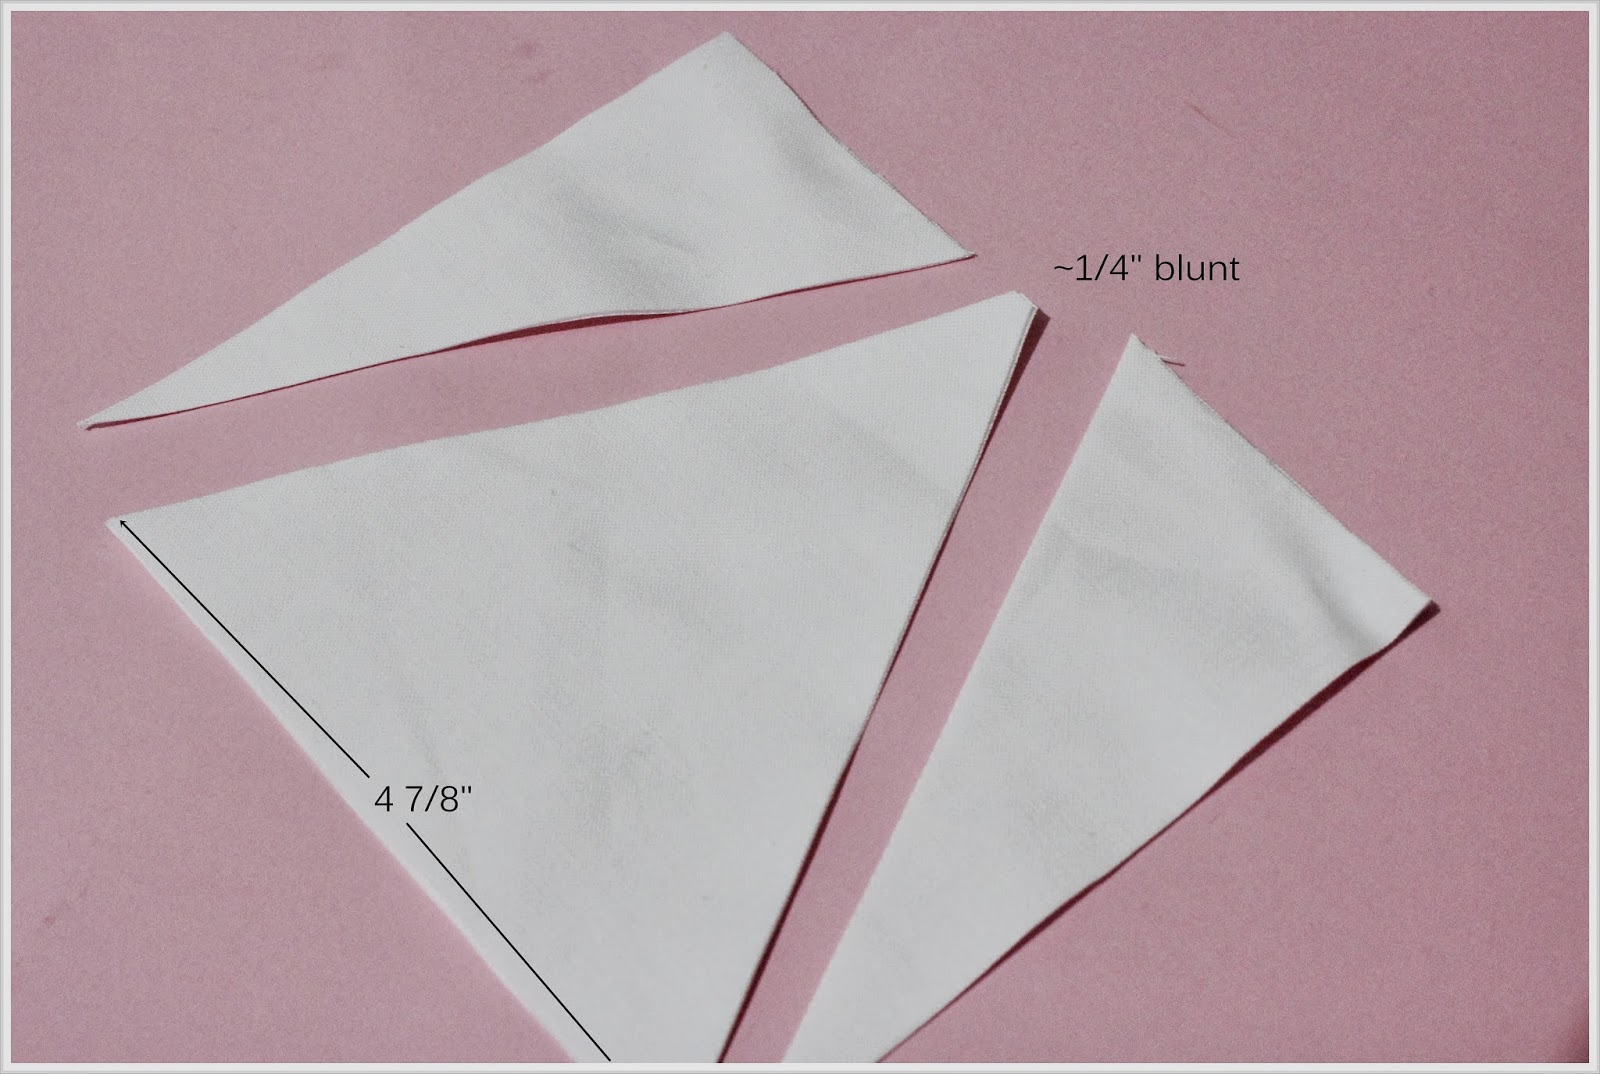
For the almost equilateral triangle, take the 4 7/8″ x 4 3/4″ block and fold in half. Keep in mind that the  4 7/8″ side is the base of the triangle.


Now, you want to cut this triangle as so that the tip is not as sharp. It should be about 1/4″ blunt.

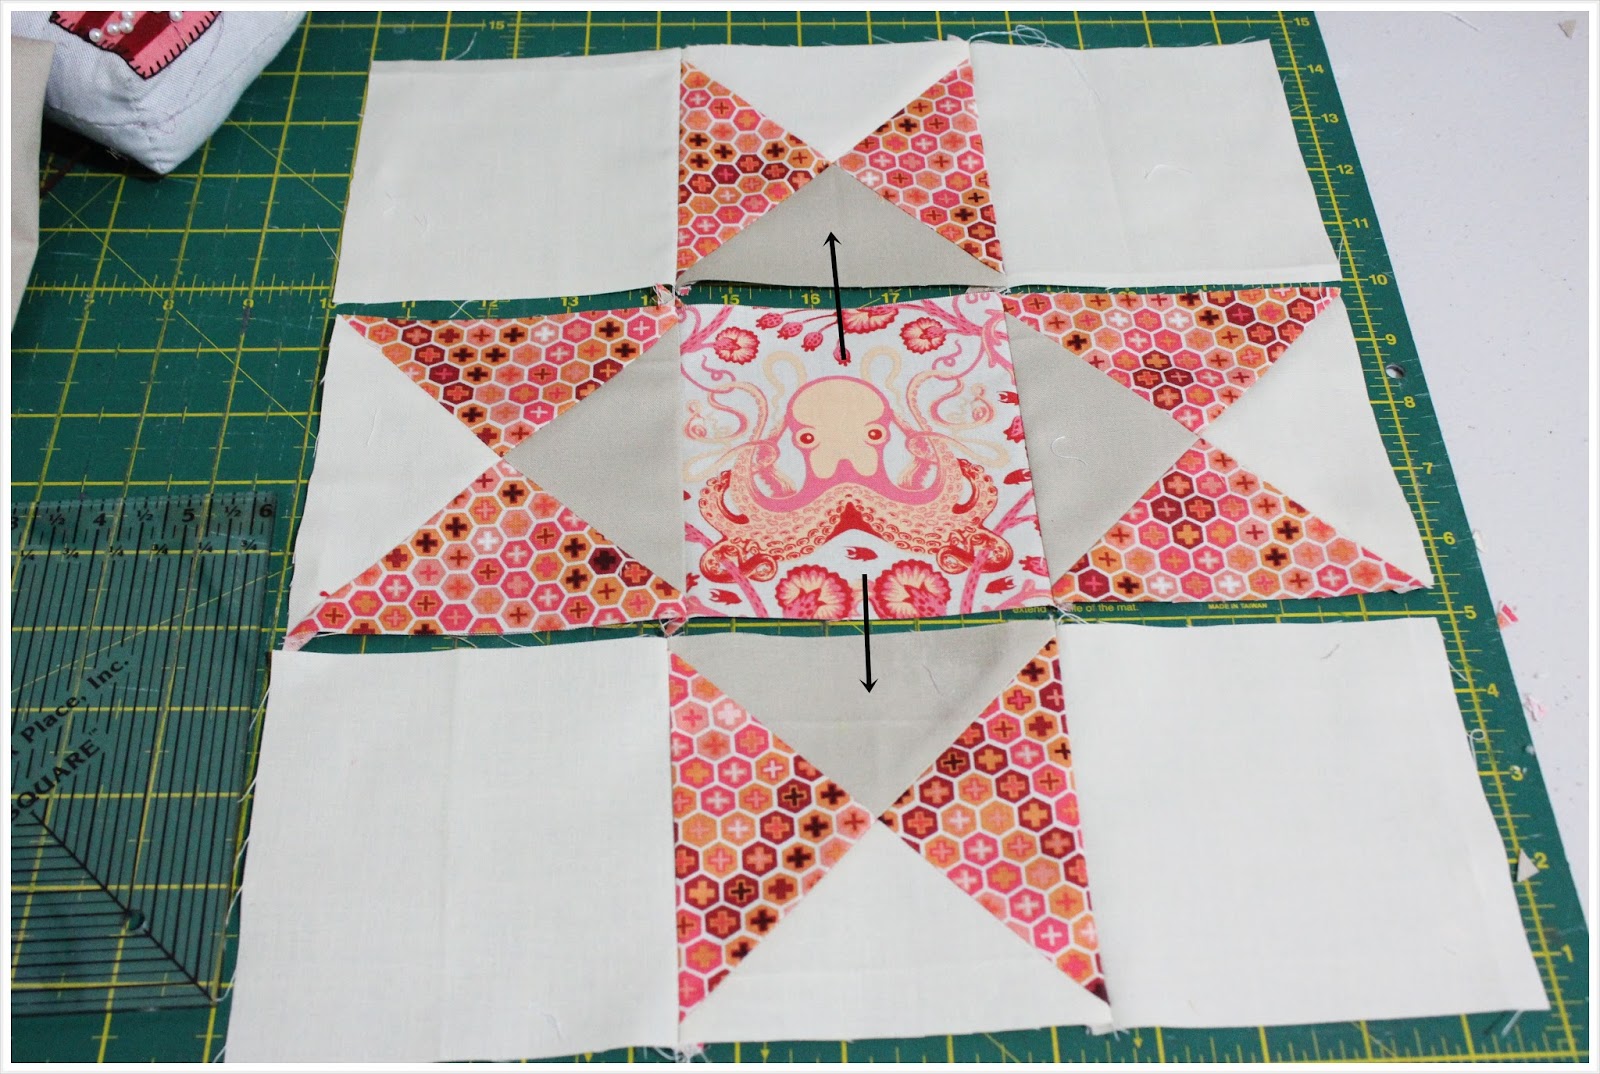
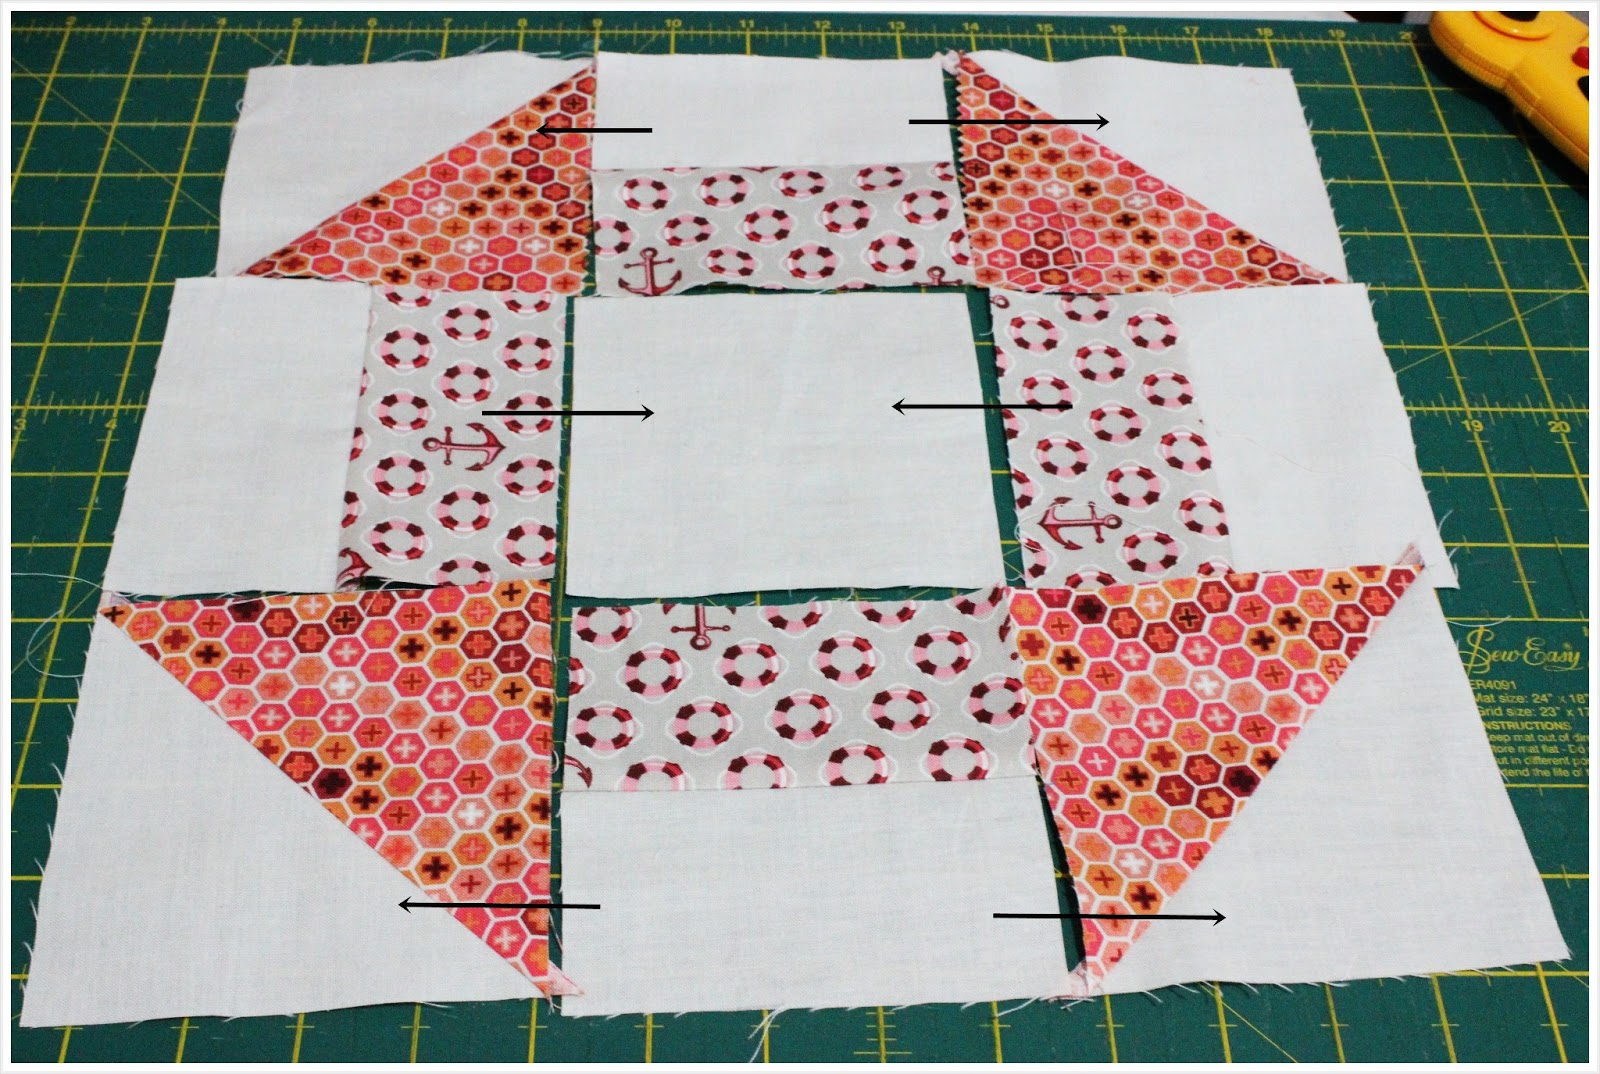
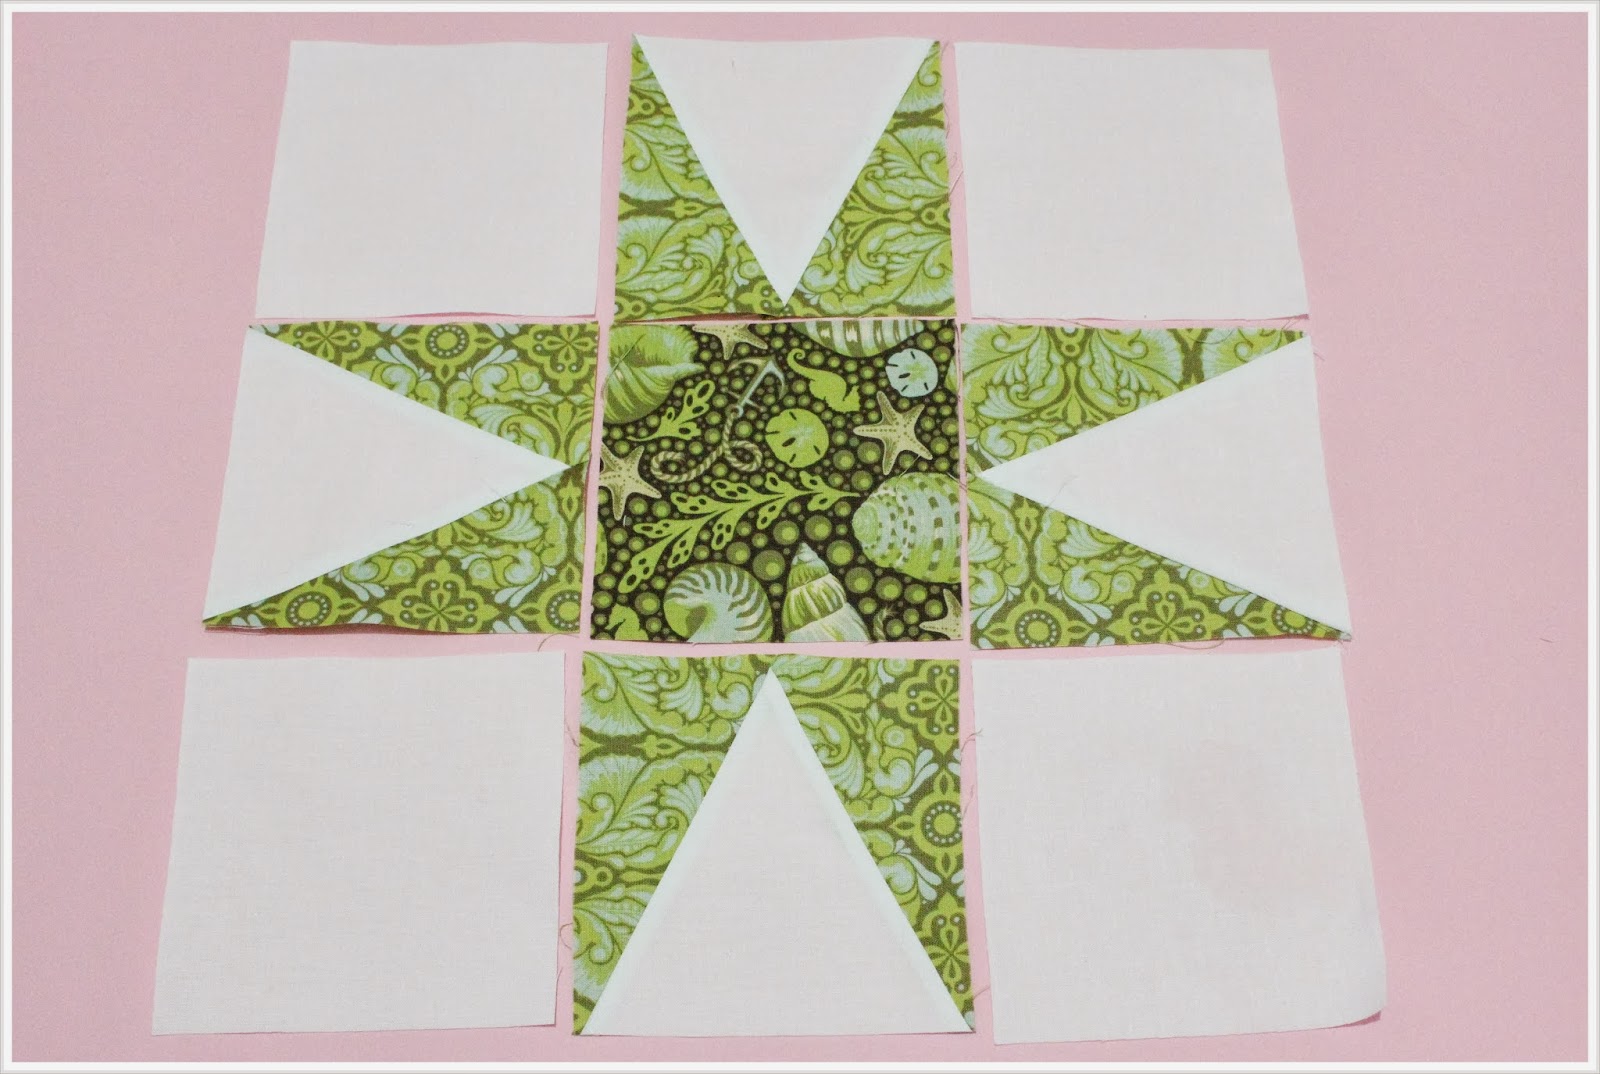
Now, piece the star points by joining the printed triangles with the equilateral triangle. I press my seams toward the equilateral triangles. Once you have all 8 points ready, arrange the pieces in 9 patch as below.

Start sewing in rows then sew the rows together minding the seams so that they would either nestle or opened.

<

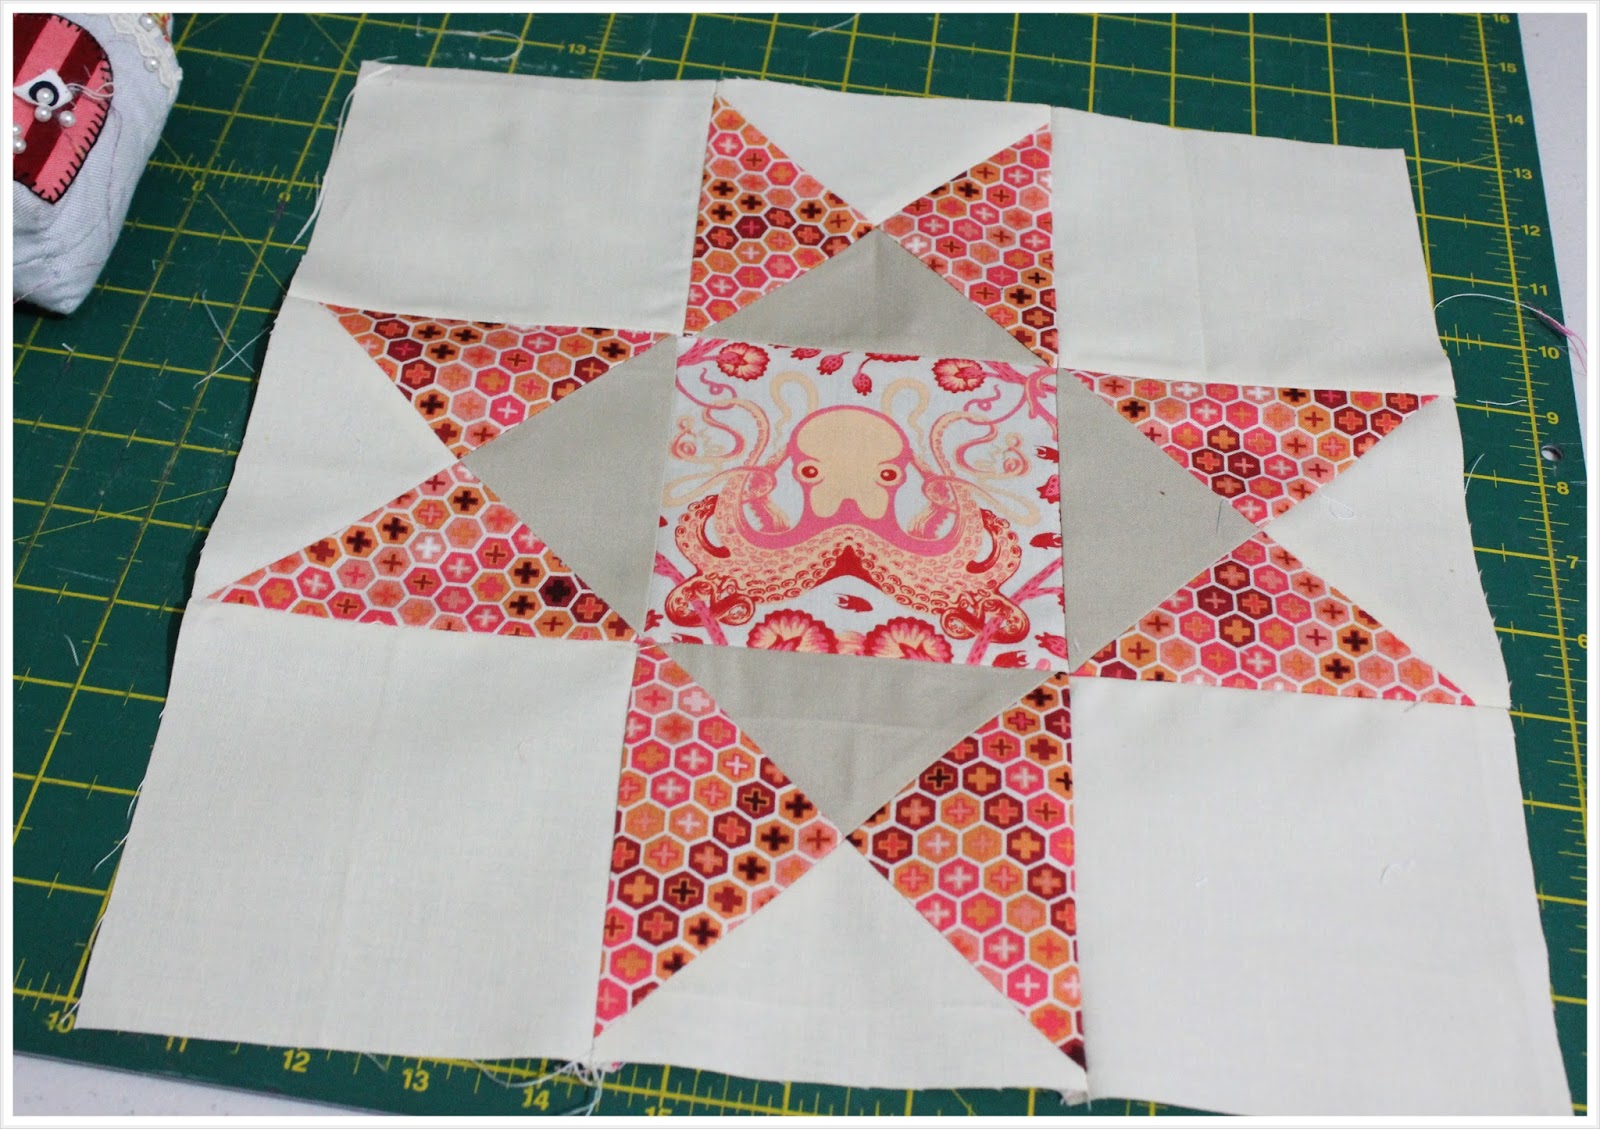
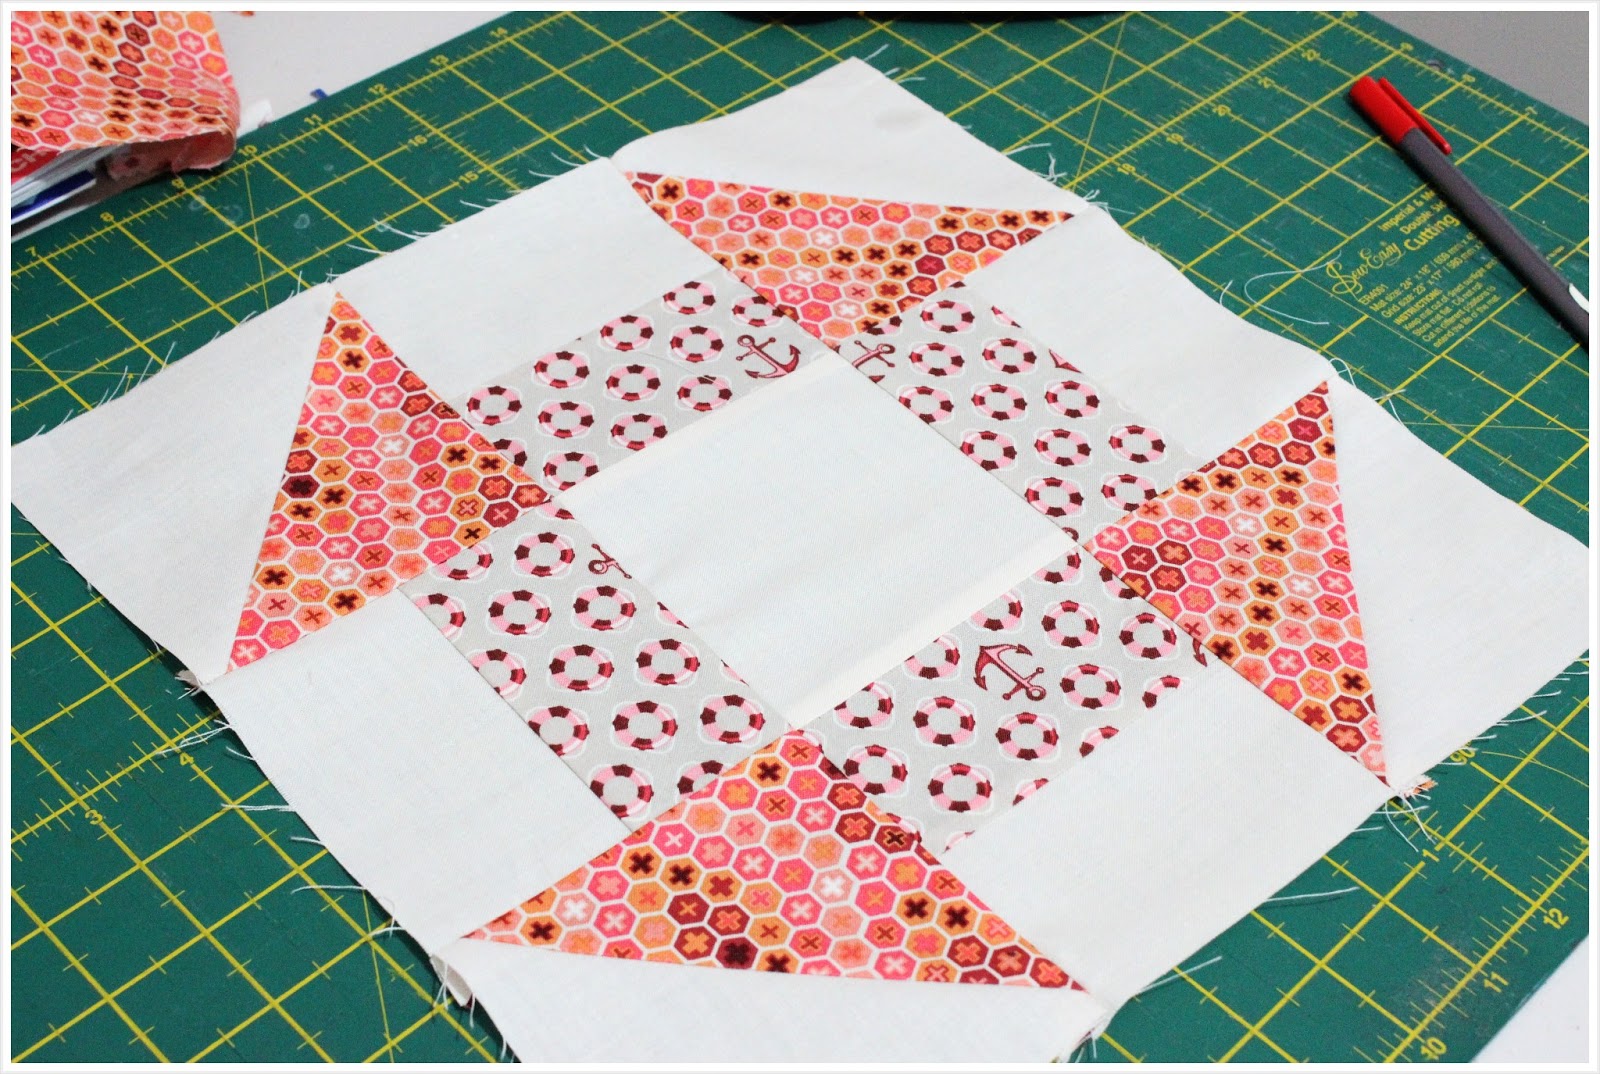
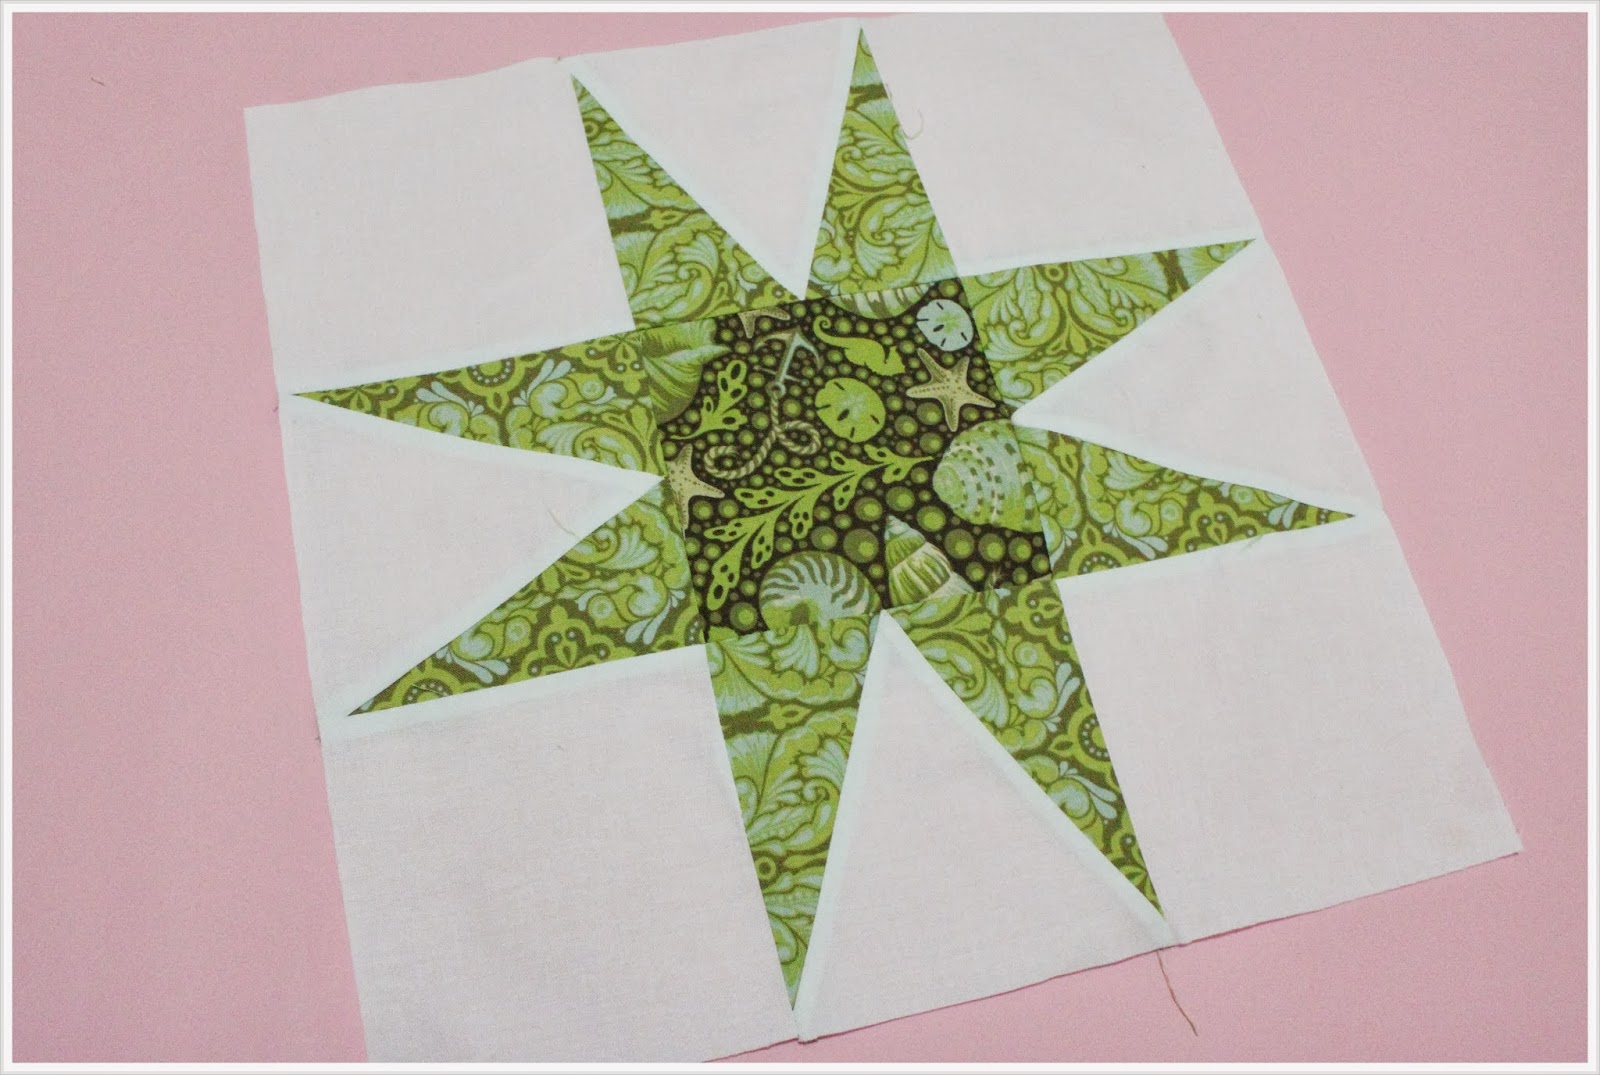
Well, that’s it. I love how pointy the star look. Trim your block to 12.5″ square

<

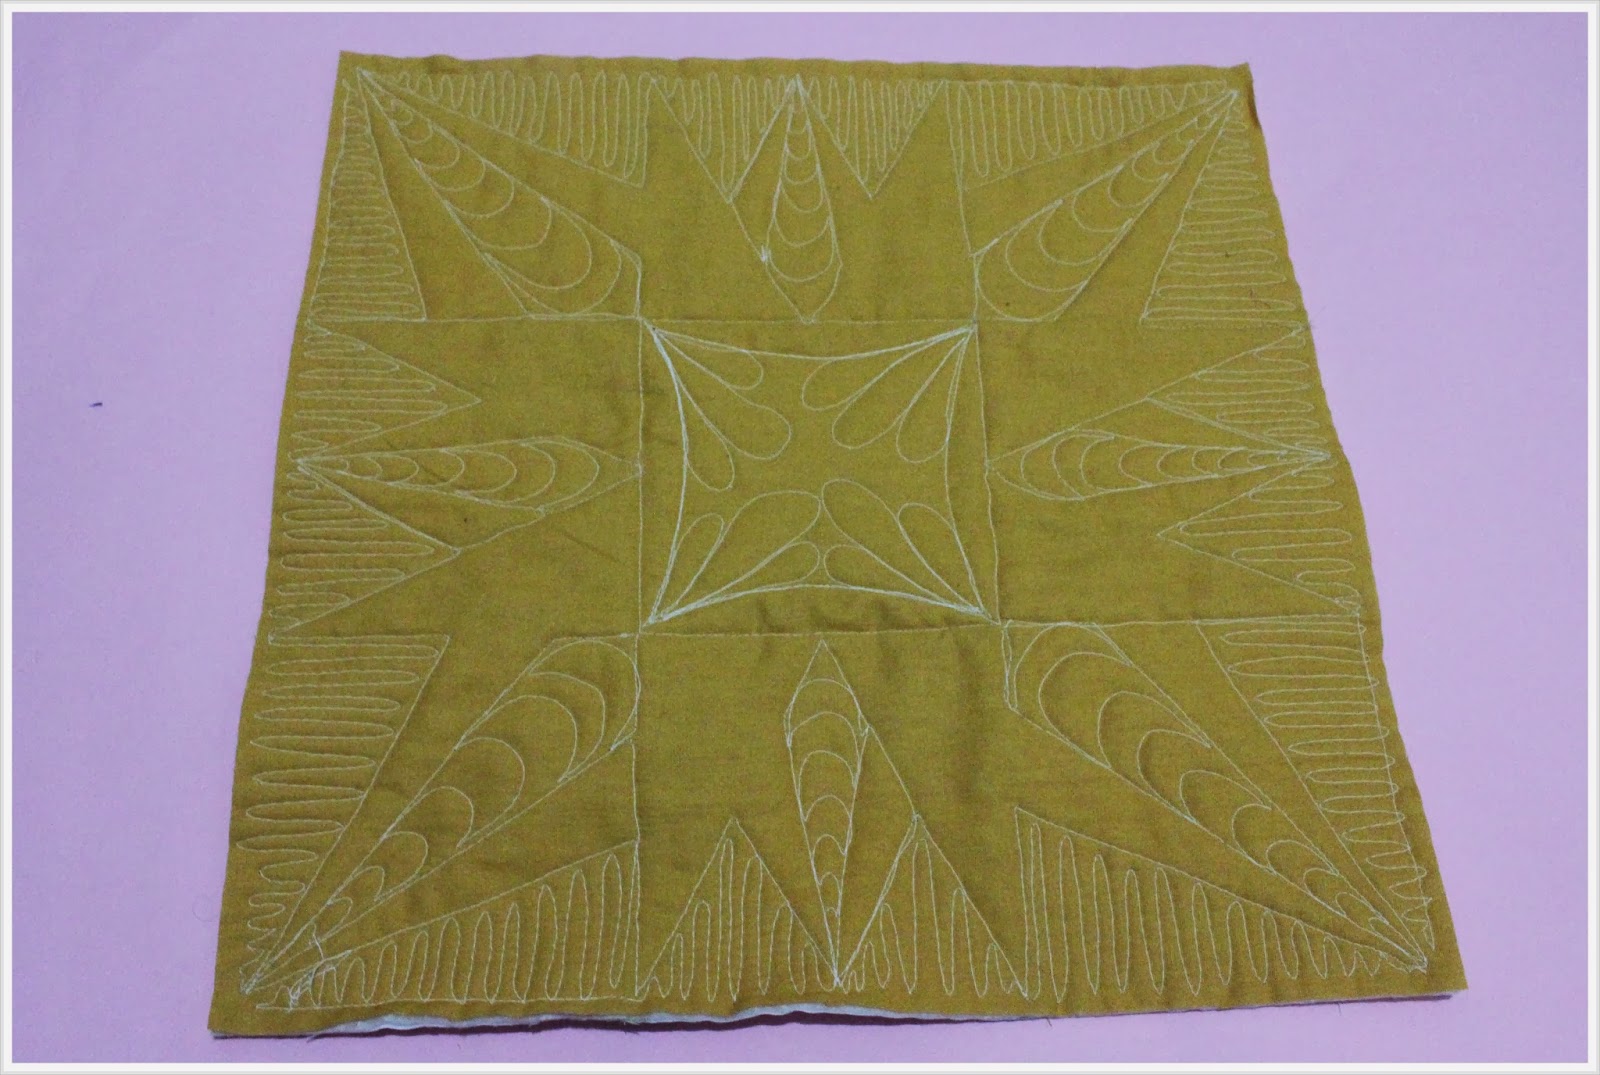
Now, let’s get quilting!

Custom Free Motion Quilting Tutorial – Secondary pattern

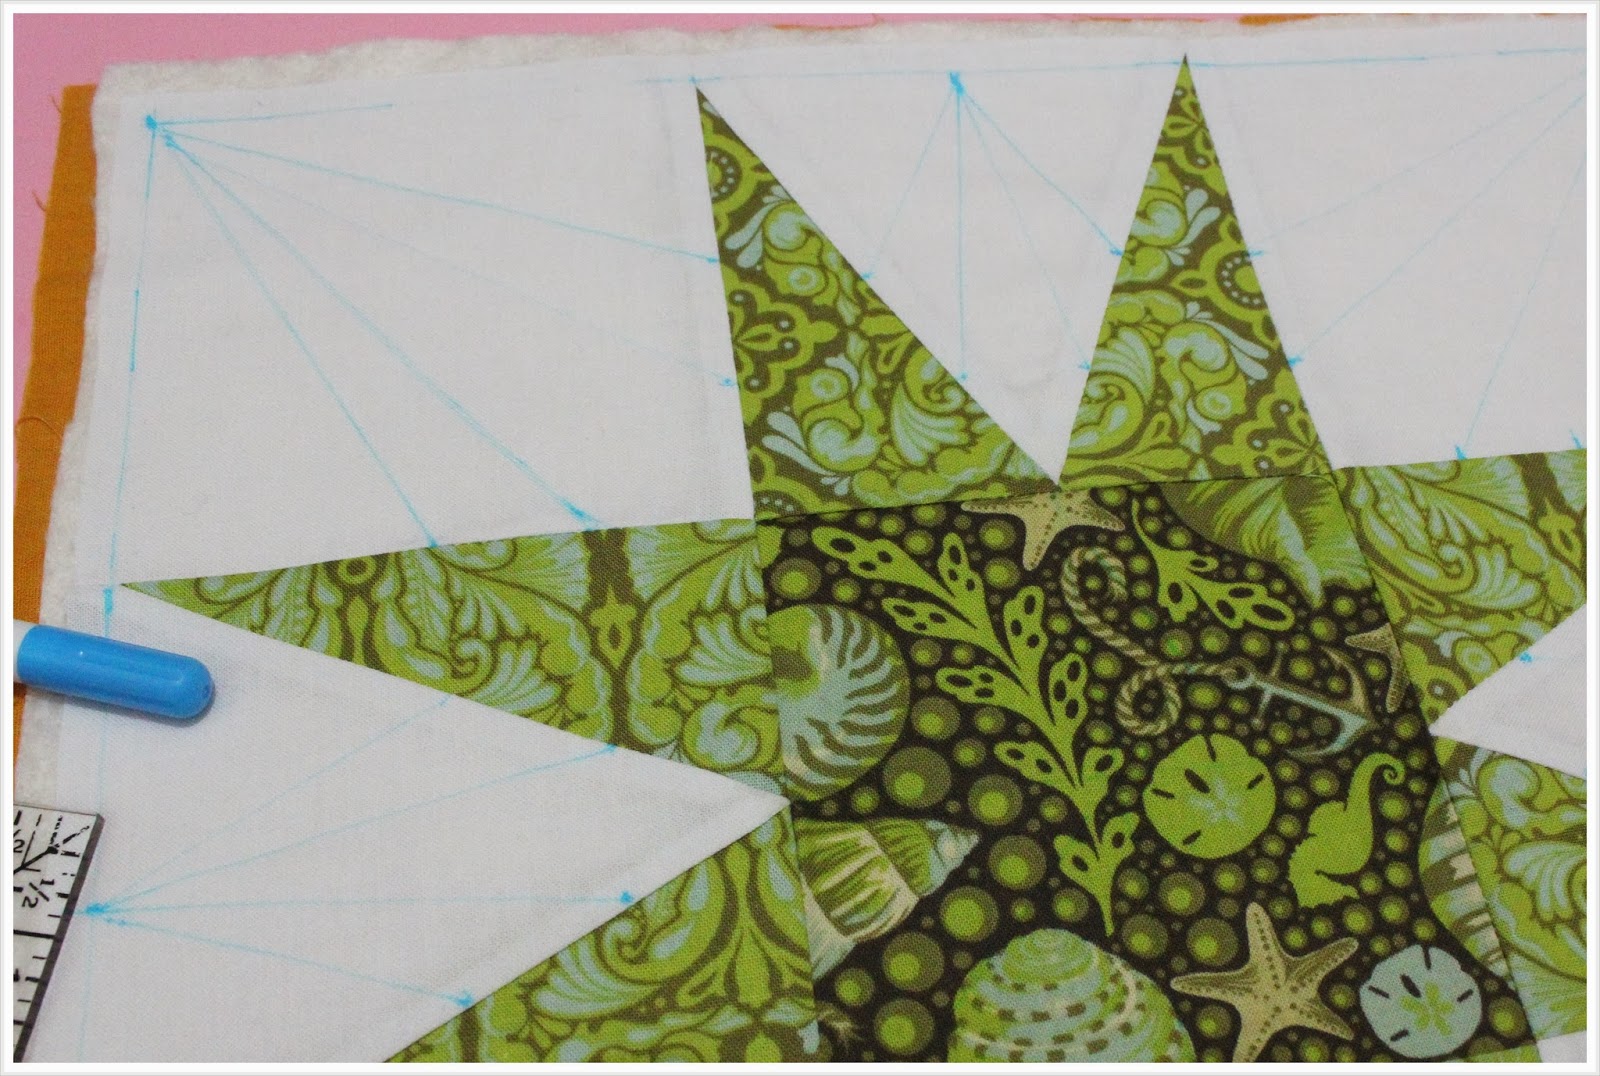
This time round, I will show you how to create more points for the star through quilting. This will be a secondary pattern that will give the block a little more feature.

Firstly, measure 1/4″ from the side, and mark all around with an erasable pen. Then, mark 1″ and 2″ from the valley on each sides of the points.

From these points, draw a line towards the center of each valley.

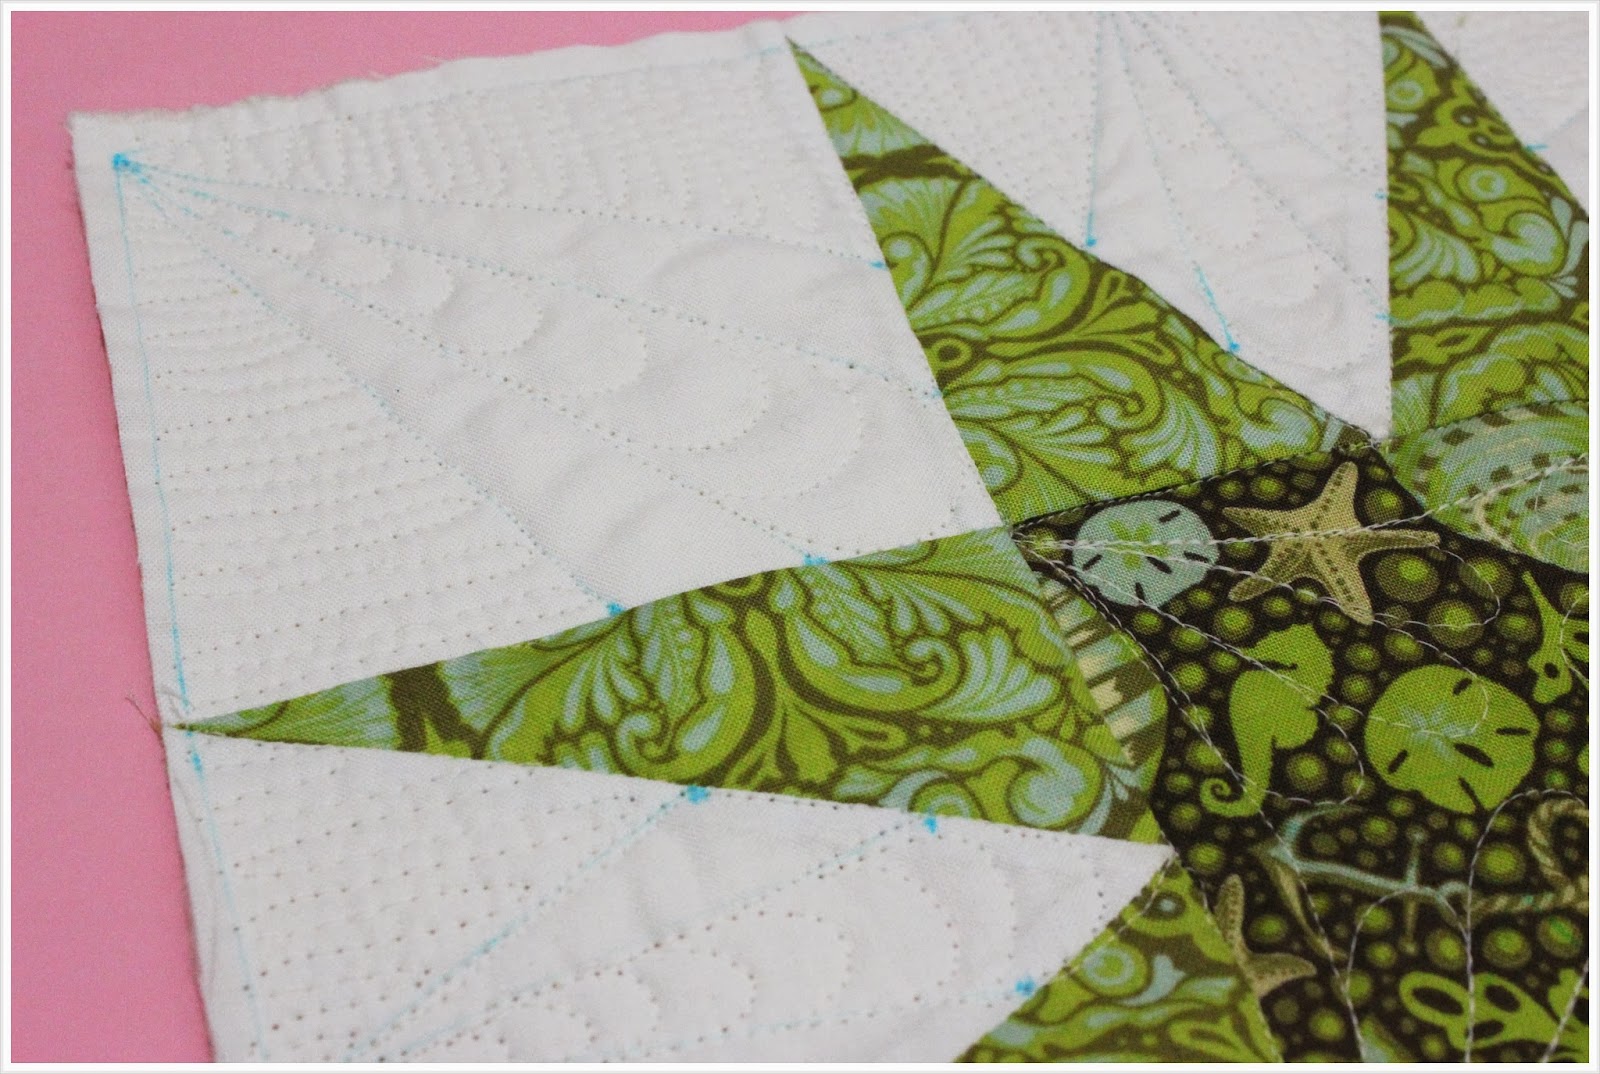
I started quilting by quilting on the lines and then fills in the spaces between the lines with a filler of back and forth quilting lines. The denser you do these back and forth lines, the more of those unquilted parts will pop out.

Finish off by adding any features in the middle and that’s it for this block!  I hope you enjoyed making this block and quilting it!

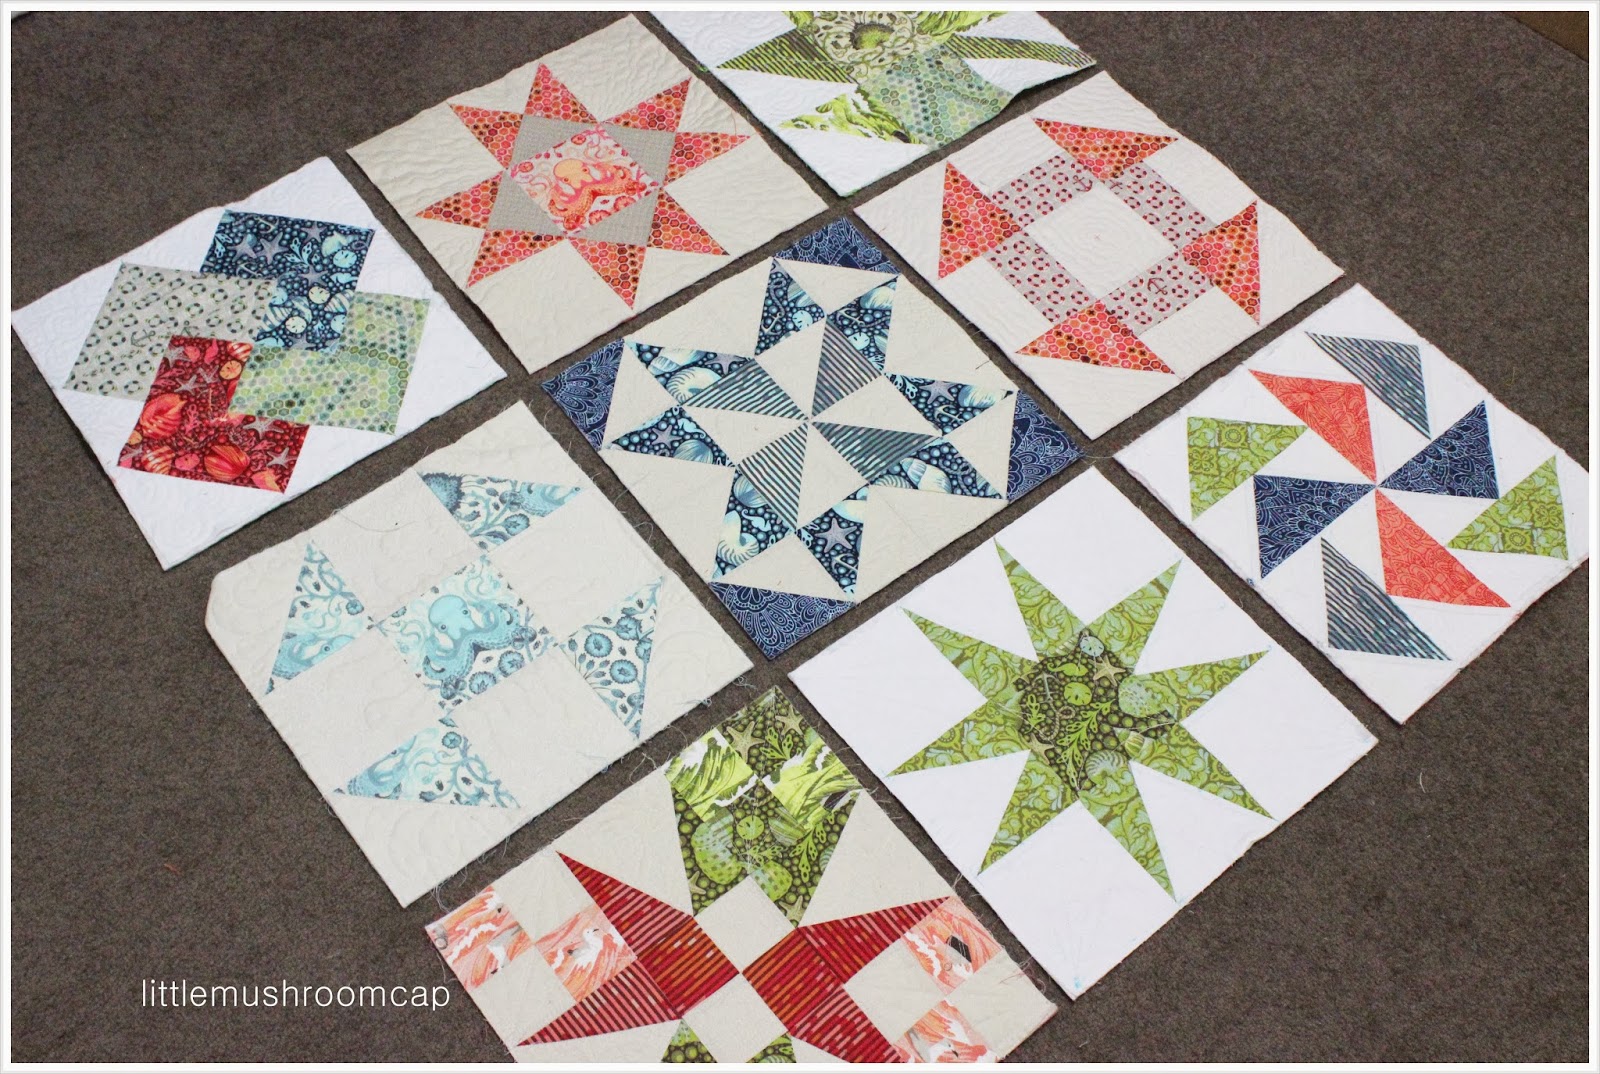
Here is where we are at now! You can arrange your blocks as you like and we will be attaching them together soon and binding it off.

I love the fun coloured backing I chose for this Quilt As you Go! Are you as excited to put the quilt together?

Let me know how you go!

Hugs,

Amira

Yes I am very late to post on this one (soo sorry for those waiting) but better late then never I believe, so here comes September block – to piece and to quilt it.
If this is your first time here, you can read more on this QAL by clicking here.
If you miss previous post you can always go back to all the post by clicking the button on my blog sidebar or below:
YourSiteTitle
So here is how the final block look like:
 So, the cutting direction is as follows

Cut 2 pieces of 7 1/4 ” x 3.5″ rectangles from each of the four printed fabrics. Fold in the middle and cut diagonal corner as in the photo below.

For the solids, cut 8 pieces of 3.5″ square and fold center diagonally and cut through the diagonal fold.
You can chain piece all the solid to each corner of the middle printed triangles with a very scant 1/4″ seams and press them open
Do both corners and you will end up with 8 flying geese sets.
Arrange them to your liking and piece two flying geese together and you will end up with four squares with two geese in each one.
  
Sew the 4 patch together and you are ready to quilt it.

Baste as usual. Mark about a quarter inch inside each corner of the solid background
Quilt a line connecting all three dots marked and do a dense quilting inside each triangles.
Finish up by simply quiting lines coming out one corner of the printed triangles to the opposite side, spreading as even as possible. If you are not confident, you can also draw a line with washable pen first.
Here is the back of my block so you can see the quilting better.
I may have ended up with a wee bit small block for this one because I did eat a bit more than a scant 1/4″ seams. For triangles and biased seams, I find it very important to keep the seam perfect to end up with a perfect size in this case 12.5″ block unfinished. I hope you will do better than me. I need more practice.
Well, we are nearly at the end of the QAL. This month I will also share the last block of all and we are soon to piece them all together!
As always, don’t forget to add your version to littlemushroomcap flickr group!

XOXO

This post is a part of a quilt along series which I have archived HERE.

In this post, I share how I quilt block #7 of the About A Quilt Sampler.

This time, I tried quilting on grid marking. I marked mine 1/4″ apart, but I think it is a bit too small. You can try 1/2″ apart instead. Mark grids using washable pen in areas that you would like to try some grid quilting.

First quilt the middle square as you prefer. I highlighted the octopus and did a simple swirly around it.

Then I quilt a bead shape trail along vertical lines of the grids till it fills up the whole area then turn and do the horizontal lines with the same bead shape trail.

As you can see, from one area to another area of the grid quilting, I also fill up other areas with radiates and curves pattern. I do this in order to travel from one place to another without having to cut off the threads and starting again. Though if you feel like filling up all the grid area you can too, just stop and do a couple of static end stitches to ensure no stitches will come off later. Then you can start again at another corner of the grid quilting area.


Here is how my block looked liked in the end. Trim to 12.5″ block

Here is the back.

Here is a close up of the grid quilting.

Have a go at grid quilting and some radiates!

Quilty hugs,

Amira

Hi!

Block for August is here! I decided to make this block for this month:


 If this is your first time here, you can read more on this QAL by clicking here.

If you miss previous post you can always go back to all the post by clicking the button on my blog sidebar or below:

YourSiteTitle

The tutorial for the block above is as follows:

Cutting direction :

1 Piece of slightly darker solid measuring 5 1/4″ square
1 piece of light solid measuring 5 1/4″ square
2 pieces of printed measuring 5 1/4″ square

4 Pieces of light solid measuring 4 1/2″ square
1 center square (can be fussy cut) printed measuring 4 1/2″ square


Stack all the 5 1/4″ squares and slash through the diagonals so that you will have 4 triangles from each squares.


Pair up one solid triangle with one printed triangle and chain piece all of them making sure you will end up with the solid triangle on the right hand side.


Piece the two large triangle together as the photo below forming a square.


Square up the patched piece into 4 1/2″ square 


Arrange all the 4 1/2″ squares and piece them as aroows shown in the photo below forming three rows.


Piece the three rows together 


And voila! You are done! Press seams, and trim to 12.5″ square


Hope you have fun making the block! As always, don’t forget to add your version to littlemushroomcap flickr group!

Will be posting on the quilting soon!
Till then,
XOXO
Hi!
I am on the late train to blogposting lately. Life can get messy right?
Anyway, today I am posting you the 14th post on the About A Quilt Sampler QAL. We will be quilting the Churn Dash block.
 If this is your first time here, you can read more on this QAL by clicking here.
If you miss previous post you can always go back to all the post by clicking the button on my blog sidebar or below:
YourSiteTitle
I thought I’d keep it simple, so here is my block quilted with wavy lines
Although I started with the wavy lines on the sides instead from the center I really suggest you to avoid that. Always try and quilt the center first then go out from the center. This should prevent any unwanted fold at the back and any bulge.
So a tip for today :
Whether you are quilting small block or a large quilt :  quilt from the center.
I marked the center then started to do a swirly wavy lines. You can play with the density of the lines. I think it will look great having dense lines close to each other.
Or you can also try starting with dense line then sparse it as it comes outwards.

Here is my finished block
From the back:
Well, I hope you will try some wavy natural lines in your block. It is fun and easy! You can add your version to littlemushroomcap flickr group and I would love to see it.

Till then,
XOXO
Welcome back to About A Quilt Sampler QAL. If this is your first time here, you can read more on this QAL by clicking here.
If you miss previous post you can always go back to all the post by clicking the button on my blog sidebar or below:
YourSiteTitle
We are already on our sixth block with this QAL. The sixth block of this QAL is churn dash. 
Follow the instruction below to get your sixth block.
Cut the pieces as below:
Sew in rows and press as per arrows shown below
Trim your block to 12.5″ Square and voila! You are done! 
I love this simple block. Makes me want to make more of churn dash! And maybe make a churn dash quilt someday!
Hope you have fun! Thanks for following me along! You can add your version to littlemushroomcap flickr group!

XOXO
Hi!
Today I am going to share you how I quilted my block 5 for our About A Quilt Sampler QAL. If you want to join in and new here, you can find more on this QAL by clicking here.
Before we go onto my quilting, I would like to just share you a few tips I learn as I go through this free motion quilting adventures;

1) Don’t be afraid of making lines that are not so perfectly straight, and don’t worry about it too much – just move on. (as we are still learning,  it has to start somewhere right, so don’t be too hard on yourself)

2) Make use of simple stippling or any simple technique that you are used to in a different way ( I am going to show you one way today)

3) Enjoy free motion, and don’t stress out. Find your liking and try and venture out from there. I personally like to try a lot of different designs, and I mostly change without a real plan, I love thinking as I go and just go for it!

So this week, why don’t you challenge yourself using just a simple technique such as stippling or scribbling and enhance out some features which you can draw first prior to quilting.
I drew out shells, seahorse, ropes and a starfish. I picked this out just from the fabric I used. You can also do that, pick something from the fabric and try to implement it in your quilting.
After you draw the features with erasable pen, you can start by free motion the outline of the drawings and start stippling or scribbling around it, creating a dense quilting and this shall pop the features.
However, in stippling case, you have to make sure that the stipple are small and packed in order to ensure that the features really pop out.

I used scribble for the pinwheel and stipple for the outer triangles. Scribble is more dense and more forgiving as you can just cross lines and does not really have a rule!
Once you are done with the block, trim it close to the block size. In this case, 12.5″ block.
I hope you to see yours if you make one! Share it here in flickr!
Till then,
XOXO
 
Hi!
 
 
Welcome back to About A Quilt Sampler QAL. If this is your first time here, you can read more on this QAL by clicking here.
 
 
If you miss previous post you can always go back to all the post by clicking the button on my blog sidebar or below:
 
YourSiteTitle
 
We are already on our fifth block with this QAL. The fifth block of this QAL is the half square triangle star
.
 
First, you can choose 3 print fabrics and one solid background or you can just use one print only. I love a scrappier look, so I use various blue prints.


Press towards darker side of fabrics or press open
 
Arrange your half square triangle blocks to match the block layout and sew them row by row taking notes where to press the seam to allow it to nestle well.
 
 
Well, I hope to see you again when we get to quilt this block! Thanks for following me along! You can add your version to littlemushroomcap flickr group!
 
XOXO
 
Hi!
Welcome back to About A Quilt Sampler QAL. If this is your first time here, you can read more on this QAL by clicking here.
If you miss previous post you can always go back to all the post by clicking the button on my blog sidebar or below:
YourSiteTitle
We are already on our fourth block with this QAL. The fourth block of this QAL is the leaf block.

You can find how to piece this block here.

In this post, I will be sharing with you I quilted mine.

I had envisioned feathers wrapping inside the leaf so I went ahead and go with it.
Free motion Quilting_Quilt as You go_About a Quilt Sampler QAL Block4

Free motion Quilting_Quilt as You go_About a Quilt Sampler QAL Block4_back

You can practice doodling the quilting with this practice sheet as I did here. If you are still not confident with feathers, you can trace the vines instead as I did in the second block below.

Free motion Quilting_Maple Leaves

I filled the background with swirls and pebbles. Of course you can fill it with whatever filler you wish to do. You can get tons of inspiration and tutorial by Leah Day here.

If you want to practice feathers, I find Carla Barret’s practice sheet very useful. Get use to doodling it with paper on pen first and you will get there. Mine still need practice, but I am pretty happy so far.

Here is how I do my feathers:

Feather Quilting

And here is how I do Swirls and Pebbles.

Swirl and Pebble Quilting as fillers

Well, I hope to see some block made and posted to flickr group!

Till then,
XOXO

Follow on Bloglovin